Sunday 23 January 2011

Hair Styles all the way...

Client; Miss Rachael
Stylist ;Me(Becca


Client ;Mrs Charity 
Hair; Xpression for braids
Style ; Single plaits twists.                                                                
Back view;


Side view of twists..


Client; meeee(lol)
Hair;Sensetionnel bump hair
Stylist; me
style; invisible parting 


Client; Mrs Esther 
Hair; Xpression shimmer weave
style;pick n drop on top, weave beneath.
Front view;


Client;Miss Natalie
Style;Twists 
Hair;Xpression for braids
Before hair picture;


Happy Client.


Client;Miss VirtousKelly
Style; Ghanian cornrows in ponytail
Hair;Xpression for braids..


GROOMING YOUR EYEBROWS(MY EYEBROWS AS GUINEA PIG)

EYEBROWS; This is the most important part of the face as far as im concerned! Once your eyebrows looks right, the rest of your face looks formed and you can afford to go out without makeup.
I have seen several types of brows and below I am going to show you how to get your eyebrows looking nice.


The first thing is to ALWAYS remember that no matter how dark your lashes are; You should NEVER use BLACK eyebrow pencil. No matter how nice the shape is , you would end up looking mean so to speak. 


Never forget that eyebrows are supposed to look natural and make sure there is no SHARP JUMP between the beginning and the end of your brows. It needs to gradually thin out from beginning to end. Not like this;


Thirdly, your brows should not be drawn too long all the way down to the end of your face. It makes it look like you have something crawling on your face!


The next thing to remember is that you really do not want to look permanently suprised. Its really not a good look The arch of your brows should not be too high. Heres an example..


BEAUTIFUL EYEBROWS.... To get gorgeous eyebrows,you must remember that you want your eyebrows groomed and neat. There are several ways to get your brows looking nice;


1.TWEEZING;This is using tweezers to gently pluck out the hairs. There are slanty ones, straight ones and other types. pic of tweezers below...


2.THREADING;This is an indian technique of using thread to pluck out hairs from the roots. It lasts very long but can also be very painful. (im used to it now , doesnt hurt me any more). 


3.RAZORS;This is another method of using blade to scrape off the hairs you want to get rid off. The only disadvantage with this is that the hairs grow back really quickly.


Whichever of these methods you use, the important thing is too make sure you get a nice, clean groomed brow.


HOW I DO MY BROWS...


My brows are really thin and I always have to fill in with pencil. The trick to getting a natural looking brow is not drawn the line on but to mimic the way  my brows grow naturally by drawing short strokes in the direction which my brows grow.Here is a pic of my brows before I filled in with pencil..

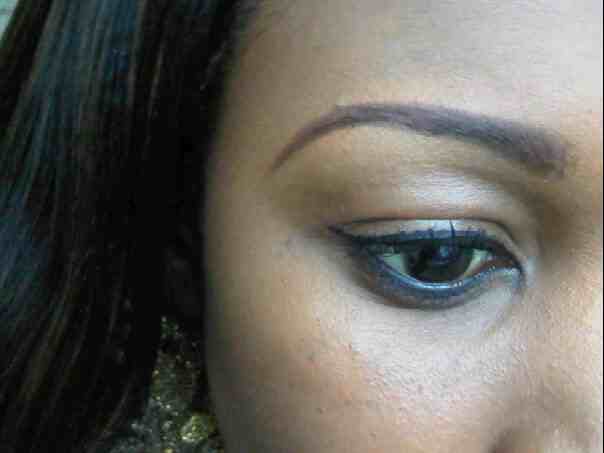
I use a soft brown pencil to gradually draw brisk short strokes following the way my brows are groomed.DO NOT start directly from the beginning as eyebrows are naturally light at the top. I DO NOT draw a straight long line as that would look too penciled in . The idea is to use a pencil but still maintain a natural look. I  then use a concealer 2 shades lighter than my skin tone underneath the arch to make it pop(remember this is my personal method, you could use eyeshadows to create the same effect in colors such as dusty gold,beige etc. no dark colors though). After this, I use a powder brush to dust a bit of loose powder on it so it does not turn waxy after sometime. My end results are usually like this:

  IN full makeup it tends to look like this:
Well thats my blog on eyebrows... If you do not get it perfectly the first time , dont give up. REMEMBER practice makes perfect! Remain Beautiful.....x


Friday 14 January 2011

MAKEUP ESSENTIALS;FOUNDATION(TYPES 'n' APPLICATION)

Foundation is usually the basis for any full makeup application. It creates a canvas on which every other application can be done. Foundations can come in different forms such as the following;

1.Liquid Foundation-  This comes in liquid form. Its the most common foundation because its really easy to apply(my favourite). Liquid Foundations come in different coverage levels e.g medium coverage, full coverage.

2.Stick Foundation-This is a cream foundation and concealer mixed in one. It gives really good coverage and is really quick to apply. 
 3.Mousse Foundation- This is a light whipped foundation. Its light weight thereby giving a lighter coverage. This is great for mature skins as its so light; It does not weigh into fine lines and wrinkles.


4.Cream to powder Foundation- This is really good for oily skin and it is a faster alternative to liquid foundation. 


5.Cream Foundation; This can be used as a concealer and foundation as it is really thick and gives great coverage. Its normally used on dry skin or if you want an a perfect finish.
6.Powder Foundation- This has very light coverage and is mostly used daily as it is really easy to apply. Younger girls who are starting freshly with makeup are usually adviced to use this.
7. Spray Foundation; These are fairly new in the market and comes in a can spray bottle. You can spray on a foam applicator and apply to face or just apply directly.


I have seen several types of application and sometimes one is dismayed at how the full look comes out...Im not going to put up pictures so that i do not offend any body.Below Im going to take you through how to apply foundation properly....


HOW TO APPLY FOUNDATION..

1.Choose well- The first and most important thing is to make sure you have the right colour for your skin.Quite a lot of times you are told to use 2 or 3 foundation colours based on the amount of skin tones you have but the best thing will be to get a concealer that is 1 or 2 colours lighter than your main skin colour and use that to hide your imperfections. You can now go ahead and apply your foundation. The best way to find the right foundation for your skin is to go bared faced to the departmental store that specialize in these products and have a makeup artist help you pick out a right colour by trying it on your skin to get a near perfect match.


2.Have the right tools-Foundation can be applied with sponge applicators, foundation brush etc depending on the type of foundation you are using from the above list.


3.Using your sponge applicator(damp); Dot little bits of foundation on forehead, nose, chin  and work your way outwards towards your hair line. Make sure to blend properly into hair so that it dissapears and does not leave visible application lines. 

4.View your application in natural light to see if you have missed any areas or need proper blending. Blend into your chin properly towards neck so foundation dissappears into neck area.

5.If you have excess foundation on, Please use my special SAM FINE trick. Get tissue paper and split into 2(most tissues come in 2ply hence the splitting). Use just the single sheet to GENTLY DAB at the foundation thereby taking out the excess.


6. Finally apply a little bit of powder to complete your look. 


I always encourage you to leave a comment..... Remain Beautiful x

Wednesday 12 January 2011

MAKEUP ESSENTIALS;LIPLINERS 'n' LIPSTICKS(APPLICATION)

Lipliners and Lipsticks are a very essential aspect of applying makeup. I am a personal lover of both and you do not have to buy overly expensive ones to get a fabulous look! Lipliners come in all sorts of colours and are mostly in pencil form. If you do not have a lipliner, an idea is to use the lipstick as the liner. There are several types of  lipliners and lipsticks...


HOW TO APPLY LIPLINERS AND LIPSTICKS

1.Make sure to have previously applied a little lip balm or gloss to soften lips and prepare it for the application
2. If you are wearing full make up; you could apply a little bit of concealer to your lips so as to help hold the lip stick stay for longer.
3.Get your lipliner and draw a line round the edges of your lips
 A really neat trick I learnt from SAM FINE is to make sure that while lining your lips; you smudge the line towards the fleshy parts of your lips ie gradually upwards towards the middle of the lips. This makes the line near invisible after you apply lipstick but still gives the lips that defined look.


4. Use a firm lipbrush to apply the lipstick all over the lip but inside the line you drew at the edges. Make sure to blend the lipstick properly....                  


 NOTE; you can also apply straight from the tube as that is usually easier and faster. The brush justs gives a more precise application..

PLEASE AVOID BLACK LIPLINERS..


Not all lipsticks have shine to it. Some are matt and others come in form of tar as seen below.... You can always add a little bit of gloss to add shine to your lips


 Finally always remember to re-apply your lipstick after eating and drinking because lipsticks rub off cutleries and cups..
Do you have any questions to ask? Maybe what brand to use? why not ask in the comment box... REMAIN BEAUTIFUL x

Friday 7 January 2011

MAKEUP ESSENTIALS; PRIMER(USES AND BENEFITS)

Primer as far as im concerned is the next best thing in the makeup industry! Primers are fairly new in the industry but so far have proven their worth.... A face primer comes in a slightly liquid but more gel-like form. The main aim of the face primer is to create a smooth base for you to apply makeup on. It pampers your skin and creates a protective base for longer lasting makeup... In one sentence "Its the best way to protect your skin and help your makeup last longer without smearing or melting away"

 Primers are advisable for people who have combination/oily skin as it helps the skin keep the oil from coming through your makeup. They are usually oil free and also fragrance free so the risk of a reaction is very limited. It also works well on dry and sensitive skin as it nourishes the skin and also calms inflamations that would normally arise with sensitive skin. 

A makeup primer should be applied AFTER moisturizer and application should be done with hands to reach those hidden areas. Apply on eyes, lips, nose, forehead or all over face so as to create an even, smooth and easy perfect base for makeup application.

BENEFITS OF USING PRIMERS
1.Creates a perfect base for makeup application
2.Helps to fill in lines and wrinkles
3.smooths the face
4.Reduces risk of inflamation caused by application of makeup directly on sensitive skin.
5.It stops oil and shine
6.It hides imperfections
7.It pampers and nourishes the skin all day
8.It prevents makeup from clogging up your skin (clogged up skin will lead to spots and breakouts).
9.It makes large visible pores appear smaller and tighter
10.It protects your skin from harmful sunlight rays as some primers contain sunscreen and SPF 15 or 30.


Below are some of the best and some of my personal favourite primers; 
 This creates a smooth and invisible layer that helps protect the skin from outside elements and holds foundation. It also helps makeup last longer and stay color-true for hours. Contains Vitamins A,E and C. Perfect for all skin types...


Prime time combats flaky skin, uneven tone, excess oil and large pores. It contains SPF 15.....


"K" by Beverky Knight combats large pores and works well on any skin, it also battles combination/oily skin....


This splendid product instantly banishes fine lines, wrinkle lines and enlarged pores to reveal an almost perfect skin....


I certainly hope I have convinced you into investing in a primer. Trust me its well worth it! You are worth it(not stealing the L'oreal slogan) lol. This could just be the product you were missing in your makeup kit! Try it and let me know your thoughts on the primer......                                                                                       Remain Beautiful x


Thursday 6 January 2011

MY NATURAL HAIR...WAYS TO LOOK AFTER IT.

Have you got NATURAL HAIR? Do you find it dificult to look after it?


Your hair is referred to as natural when chemicals such as relaxers,texturizers,curly perm wave etc have not been introduced into the hair. It therefore looks afro. Looking after your natural hair does not have to be dificult when you have the right products. Usually, the same rules apply which apply to processed hair also works with natural hair except for a few exceptions.

How do i look after my natural afro?

1..Wash hair regularly as you would with shampoo...
2..Conditioning is very important! While conditioning,get a large comb as above image and gently comb through tangle while conditioner is still soaking in the hair.
3..Rinse out after combing and apply moisturizer to hair.There are different types of moisturizers but my favoutite is from the "Keracare hair range"
 This moisturizer works really well on natural hair. It has got Jojoba oil which locks in moisture in the hair.
   Treating your natural hair to a deep conditioning is very important. I personally always advice at least once a month. If your hair is damaged then once every 2week to 3weeks is essential to help strengthen hair again.


HOW TO DEEP CONDITION MY HAIR....


After washing of hair, mix a little bit of ALMOND OIL to a portion of  OSMO. I really like this product because it is a deep intensive hair repair mask and leaves your hair feeling unbelievably soft!!!


Mix these 2 products together and thoroughly saturate the hair with it. Put on a shower cap and if you so please; wrap a towel around your hair to intensify heat. Leave for about 30 mins and then rinse and style as usual.


P.S...Applying heat to natural hair through the use of hot combs and irons should NOT be done too frequently as this thins out the hair and damages it over a period of time.


Remember your hair is your "Crowning glory"...Why not take these little extra steps at making sure its well protected..                                                           Remain Beautiful x

Wednesday 5 January 2011

Timeless Beauty as a way of life: 7 STEPS TO BEAUTIFUL HAIR

Timeless Beauty as a way of life: 7 STEPS TO BEAUTIFUL HAIR: "Hey beautiful people. Ok so I decided to start blogging. Im yet to get the hang of it properly but Im sure I will soon enough.lol.Im gonna b..."

7 STEPS TO BEAUTIFUL HAIR

Hey beautiful people. Ok so I decided to start blogging. Im yet to get the hang of it properly but Im sure I will soon enough.lol.Im gonna blog about hair today, So here goes...Your hair comes in diff textures, colours, lengths etc. 
Basic hair protection guides;
1..ALWAYS give your hair a trim so as to keep split ends at bay.  
2..ALWAYS condition your hair after washing
3..Treatment is always necessary.. it helps lock in moisture which your hair needs.
4..ALWAYS wrap you hair when going to bed in e.g a silk scarf,hair net.it helps your hair from getting dry while you are asleep because your hair rubs off on your pillow.
5..ALWAYS ask your hair stylist what products he/she uses on your hair and of what importance it is to your hair.
6..Take absolutely care when using chemical products such as colours, relaxers, texturizers, demi-perm etc.
7..Before using all of the above stated; ALWAYS make sure you read the information and ALWAYS run a patch test on a small portion of your skin before using all over especially with colours.
(HOW TO DO A SKIN PATCH TEST)
Apply a little portion of color mixture to a small piece of cotton wool and put inbetween your inner elbow(thats usually my best part cos its hidden.lol)....Use a plaster and leave on there for at least 24 hours. If you do not get an irritation , then its safe to use. On the other hand, if you get a rash or discolouration that does not look right;PLEASE DO NOT USE!

Have you got your way to keeping your hair beautiful? why not tell me.....

Well....thats me for today. remember to ALWAYS REMAIN BEAUTIFUL