Product - Temptu concealer
Brand - Temptu Pro
Price - $22 / £15
Image -
This is by far one of the nicest concealers I have used . A lot of concealers dry out and crack a few hours after usage but not Temptu. It has a moist feel but still gives you coverage. Its best applied with a concealer brush but the fingers can also be used to gently warm it into the skin as well. This concealer can be used to cover undereye , red spots, blemishes, puffiness, blue circles etc. Its creamy and the more layering , the more coverage you get.
This particular concealer comes in a wheel and has 5 colours for those with skin discloration like 2 or 3 skin tones who need lighter and darker concealer colors to cover up blemishes. Ill still emphasize on the coverage. Its full coverage but light weight as well. Its one of my best buys and will continue to be a part of my makeup kit as a makeup artist.
Monday, 21 February 2011
Wednesday, 16 February 2011
Product Review - EVE PEARL HD Cream Foundation
Brand; Eve Pearl
Product;HD cream foundation
Price;$50 / £35 (please convert to currency that applies to you)
Description: Full coverage
Display picture;
My Review; Now this is a superb foundation! The colour match to the skin is unmistakable. Coverage is amazing as it covers up all imperfections including fine lines, blue marks and still gives your face the chance to breathe. This particular foundation(picture above) comes in a duo or trio for easier access which means you have less to carry. For instance; you want to apply full face foundation and contour as well, you have all lighter colours for your face and also the darker colour for your contour all in the same case! No need to carry 2 or 3 different foundation tubes or bottles.
Apply this foundation with a wet sponge and it sits nicely giving you an all round neat application which blends in properly with the neck as well. (your aim would always be to match your face with your neck when applying foundation.)
This HD foundation is also long lasting. Its HD so you look camera ready all the time. I use this on clients(picture below) and myself.
My verdict?- its worth it.
Remain beautiful x
Product;HD cream foundation
Price;$50 / £35 (please convert to currency that applies to you)
Description: Full coverage
Display picture;
My Review; Now this is a superb foundation! The colour match to the skin is unmistakable. Coverage is amazing as it covers up all imperfections including fine lines, blue marks and still gives your face the chance to breathe. This particular foundation(picture above) comes in a duo or trio for easier access which means you have less to carry. For instance; you want to apply full face foundation and contour as well, you have all lighter colours for your face and also the darker colour for your contour all in the same case! No need to carry 2 or 3 different foundation tubes or bottles.
Apply this foundation with a wet sponge and it sits nicely giving you an all round neat application which blends in properly with the neck as well. (your aim would always be to match your face with your neck when applying foundation.)
This HD foundation is also long lasting. Its HD so you look camera ready all the time. I use this on clients(picture below) and myself.
My verdict?- its worth it.
Remain beautiful x
Tuesday, 15 February 2011
IMATS(INTERNATIONAL MAKEUP ARTIST TRADE SHOW)
The IMATS (International makeup artist trade show) was held on the 29th and 30th of January 2010 at the Alexandra Palace London. First of all I would like to say it was a beautiful experience. The show consisted of several big names in the makeup industry such as Kevin James Bennett, Eve Pearl, John Woodbridge and many more wonderful speakers. It featured show of makeup skills, body art,applying prosthetics for movie makeup and so much more. Another amazing aspect was the array of cosmetics available for sale in different company exhibitors such as Eve pearl cosmetics, Crown brushes, Sleek cosmestics, Dermalogica, Brushstroke makeup school, Eye Kandy, Temptu and so many other exhibitors(Trust me it was easy to buy the entire exhibition!)
DAY 1 at the IMATS
This was on the 29th of January and it commenced at 8;30am. It had all the exhibitors in their stands, painting away at their various models
There were so many makeup stands and lectures going on in different parts of the hall. Amazing teachers such as EVE PEARL, KEVIN JAMES BENETT and many others were on hand to take us through different levels of makeup artistry such as bridal makeup, contouring of the face, airbrush makeup and many more. I also got to meet many more makeup artists. Needless to say; I learnt a lot and had fun while learning. Nothing beats that!
DAY 2...
This day was more exciting for me as I got to be a model on the live stage for one of the most amazing makeup artsits i know ;Eve Pearl. I t was a bit tricky convincing her that my face would serve her well on the stage but my persistence paid off. Here is both of us after she had "beat" my face.
Other amazing makeup artists I met on the day were Kevin James Benett of KJBenettbeauty
Uchenna of House of Touche(HOT)
Below are some of the works done on both days at the event. Amazing I must say!
There were so many and my blog probably would not take all of them. This is a show I would encourage anyone to attend. Who knows? I might even use next years tickets as part of a give away. Watch out for this space!
DAY 1 at the IMATS
This was on the 29th of January and it commenced at 8;30am. It had all the exhibitors in their stands, painting away at their various models
There were so many makeup stands and lectures going on in different parts of the hall. Amazing teachers such as EVE PEARL, KEVIN JAMES BENETT and many others were on hand to take us through different levels of makeup artistry such as bridal makeup, contouring of the face, airbrush makeup and many more. I also got to meet many more makeup artists. Needless to say; I learnt a lot and had fun while learning. Nothing beats that!
DAY 2...
This day was more exciting for me as I got to be a model on the live stage for one of the most amazing makeup artsits i know ;Eve Pearl. I t was a bit tricky convincing her that my face would serve her well on the stage but my persistence paid off. Here is both of us after she had "beat" my face.
Other amazing makeup artists I met on the day were Kevin James Benett of KJBenettbeauty
Uchenna of House of Touche(HOT)
Below are some of the works done on both days at the event. Amazing I must say!
There were so many and my blog probably would not take all of them. This is a show I would encourage anyone to attend. Who knows? I might even use next years tickets as part of a give away. Watch out for this space!
Sunday, 6 February 2011
Hi guys. Im so sorry I have been a bit quiet on the blog.Its just being work. A lot of hair styles and makeup to sort out. I have decided to do a few looks and put up such as Nicki Minaj inspired looks and many other fun looks as we gradually move closer to spring.Also I currently have a vicious afro, which im loving. Its a drastic change from what I would normally do but Its a welcome change. Heres what it looks like
Its huge i know!
Also my pictures from IMATs will be put on the blog soon. I recently did a bridal hair photo shoot and my ladies looked faboulous. All those pictures will be coming up soon too.. they will be on my facebook page (TRUE GLAM).Well thats me for today. Remain Beautiful x
Its huge i know!
Also my pictures from IMATs will be put on the blog soon. I recently did a bridal hair photo shoot and my ladies looked faboulous. All those pictures will be coming up soon too.. they will be on my facebook page (TRUE GLAM).Well thats me for today. Remain Beautiful x
Sunday, 23 January 2011
Hair Styles all the way...
Client; Miss Rachael
Stylist ;Me(Becca
Client ;Mrs Charity
Hair; Xpression for braids
Style ; Single plaits twists.
Back view;

Side view of twists..
Client; meeee(lol)
Hair;Sensetionnel bump hair
Stylist; me
style; invisible parting

Client; Mrs Esther
Hair; Xpression shimmer weave
style;pick n drop on top, weave beneath.
Front view;

Client;Miss Natalie
Style;Twists
Hair;Xpression for braids
Before hair picture;


Happy Client.
Client;Miss VirtousKelly
Style; Ghanian cornrows in ponytail
Hair;Xpression for braids..
Stylist ;Me(Becca
Client ;Mrs Charity
Hair; Xpression for braids
Style ; Single plaits twists.
Back view;

Side view of twists..Client; meeee(lol)
Hair;Sensetionnel bump hair
Stylist; me
style; invisible parting

Client; Mrs Esther
Hair; Xpression shimmer weave
style;pick n drop on top, weave beneath.
Front view;

Client;Miss Natalie
Style;Twists
Hair;Xpression for braids
Before hair picture;


Happy Client.Client;Miss VirtousKelly
Style; Ghanian cornrows in ponytail
Hair;Xpression for braids..
GROOMING YOUR EYEBROWS(MY EYEBROWS AS GUINEA PIG)
EYEBROWS; This is the most important part of the face as far as im concerned! Once your eyebrows looks right, the rest of your face looks formed and you can afford to go out without makeup.
I have seen several types of brows and below I am going to show you how to get your eyebrows looking nice.
The first thing is to ALWAYS remember that no matter how dark your lashes are; You should NEVER use BLACK eyebrow pencil. No matter how nice the shape is , you would end up looking mean so to speak.
Never forget that eyebrows are supposed to look natural and make sure there is no SHARP JUMP between the beginning and the end of your brows. It needs to gradually thin out from beginning to end. Not like this;
Thirdly, your brows should not be drawn too long all the way down to the end of your face. It makes it look like you have something crawling on your face!
The next thing to remember is that you really do not want to look permanently suprised. Its really not a good look The arch of your brows should not be too high. Heres an example..
BEAUTIFUL EYEBROWS.... To get gorgeous eyebrows,you must remember that you want your eyebrows groomed and neat. There are several ways to get your brows looking nice;
1.TWEEZING;This is using tweezers to gently pluck out the hairs. There are slanty ones, straight ones and other types. pic of tweezers below...
2.THREADING;This is an indian technique of using thread to pluck out hairs from the roots. It lasts very long but can also be very painful. (im used to it now , doesnt hurt me any more).
3.RAZORS;This is another method of using blade to scrape off the hairs you want to get rid off. The only disadvantage with this is that the hairs grow back really quickly.
Whichever of these methods you use, the important thing is too make sure you get a nice, clean groomed brow.
HOW I DO MY BROWS...
My brows are really thin and I always have to fill in with pencil. The trick to getting a natural looking brow is not drawn the line on but to mimic the way my brows grow naturally by drawing short strokes in the direction which my brows grow.Here is a pic of my brows before I filled in with pencil..
I have seen several types of brows and below I am going to show you how to get your eyebrows looking nice.
The first thing is to ALWAYS remember that no matter how dark your lashes are; You should NEVER use BLACK eyebrow pencil. No matter how nice the shape is , you would end up looking mean so to speak.
Never forget that eyebrows are supposed to look natural and make sure there is no SHARP JUMP between the beginning and the end of your brows. It needs to gradually thin out from beginning to end. Not like this;
Thirdly, your brows should not be drawn too long all the way down to the end of your face. It makes it look like you have something crawling on your face!
The next thing to remember is that you really do not want to look permanently suprised. Its really not a good look The arch of your brows should not be too high. Heres an example..
BEAUTIFUL EYEBROWS.... To get gorgeous eyebrows,you must remember that you want your eyebrows groomed and neat. There are several ways to get your brows looking nice;
2.THREADING;This is an indian technique of using thread to pluck out hairs from the roots. It lasts very long but can also be very painful. (im used to it now , doesnt hurt me any more).
3.RAZORS;This is another method of using blade to scrape off the hairs you want to get rid off. The only disadvantage with this is that the hairs grow back really quickly.
Whichever of these methods you use, the important thing is too make sure you get a nice, clean groomed brow.
HOW I DO MY BROWS...
My brows are really thin and I always have to fill in with pencil. The trick to getting a natural looking brow is not drawn the line on but to mimic the way my brows grow naturally by drawing short strokes in the direction which my brows grow.Here is a pic of my brows before I filled in with pencil..
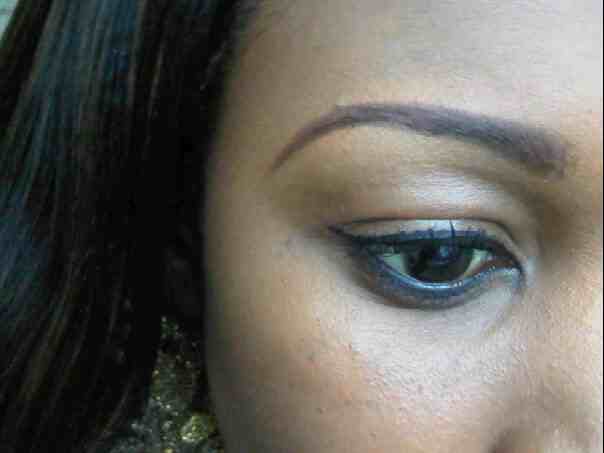
I use a soft brown pencil to gradually draw brisk short strokes following the way my brows are groomed.DO NOT start directly from the beginning as eyebrows are naturally light at the top. I DO NOT draw a straight long line as that would look too penciled in . The idea is to use a pencil but still maintain a natural look. I then use a concealer 2 shades lighter than my skin tone underneath the arch to make it pop(remember this is my personal method, you could use eyeshadows to create the same effect in colors such as dusty gold,beige etc. no dark colors though). After this, I use a powder brush to dust a bit of loose powder on it so it does not turn waxy after sometime. My end results are usually like this:
IN full makeup it tends to look like this:
Well thats my blog on eyebrows... If you do not get it perfectly the first time , dont give up. REMEMBER practice makes perfect! Remain Beautiful.....x
Friday, 14 January 2011
MAKEUP ESSENTIALS;FOUNDATION(TYPES 'n' APPLICATION)
Foundation is usually the basis for any full makeup application. It creates a canvas on which every other application can be done. Foundations can come in different forms such as the following;
1.Liquid Foundation- This comes in liquid form. Its the most common foundation because its really easy to apply(my favourite). Liquid Foundations come in different coverage levels e.g medium coverage, full coverage.
2.Stick Foundation-This is a cream foundation and concealer mixed in one. It gives really good coverage and is really quick to apply.
3.Mousse Foundation- This is a light whipped foundation. Its light weight thereby giving a lighter coverage. This is great for mature skins as its so light; It does not weigh into fine lines and wrinkles.
4.Cream to powder Foundation- This is really good for oily skin and it is a faster alternative to liquid foundation.
5.Cream Foundation; This can be used as a concealer and foundation as it is really thick and gives great coverage. Its normally used on dry skin or if you want an a perfect finish.
6.Powder Foundation- This has very light coverage and is mostly used daily as it is really easy to apply. Younger girls who are starting freshly with makeup are usually adviced to use this.
7. Spray Foundation; These are fairly new in the market and comes in a can spray bottle. You can spray on a foam applicator and apply to face or just apply directly.
I have seen several types of application and sometimes one is dismayed at how the full look comes out...Im not going to put up pictures so that i do not offend any body.Below Im going to take you through how to apply foundation properly....
HOW TO APPLY FOUNDATION..
1.Choose well- The first and most important thing is to make sure you have the right colour for your skin.Quite a lot of times you are told to use 2 or 3 foundation colours based on the amount of skin tones you have but the best thing will be to get a concealer that is 1 or 2 colours lighter than your main skin colour and use that to hide your imperfections. You can now go ahead and apply your foundation. The best way to find the right foundation for your skin is to go bared faced to the departmental store that specialize in these products and have a makeup artist help you pick out a right colour by trying it on your skin to get a near perfect match.
2.Have the right tools-Foundation can be applied with sponge applicators, foundation brush etc depending on the type of foundation you are using from the above list.
3.Using your sponge applicator(damp); Dot little bits of foundation on forehead, nose, chin and work your way outwards towards your hair line. Make sure to blend properly into hair so that it dissapears and does not leave visible application lines.
4.View your application in natural light to see if you have missed any areas or need proper blending. Blend into your chin properly towards neck so foundation dissappears into neck area.
5.If you have excess foundation on, Please use my special SAM FINE trick. Get tissue paper and split into 2(most tissues come in 2ply hence the splitting). Use just the single sheet to GENTLY DAB at the foundation thereby taking out the excess.
6. Finally apply a little bit of powder to complete your look.
I always encourage you to leave a comment..... Remain Beautiful x
1.Liquid Foundation- This comes in liquid form. Its the most common foundation because its really easy to apply(my favourite). Liquid Foundations come in different coverage levels e.g medium coverage, full coverage.
2.Stick Foundation-This is a cream foundation and concealer mixed in one. It gives really good coverage and is really quick to apply.
3.Mousse Foundation- This is a light whipped foundation. Its light weight thereby giving a lighter coverage. This is great for mature skins as its so light; It does not weigh into fine lines and wrinkles.
5.Cream Foundation; This can be used as a concealer and foundation as it is really thick and gives great coverage. Its normally used on dry skin or if you want an a perfect finish.
6.Powder Foundation- This has very light coverage and is mostly used daily as it is really easy to apply. Younger girls who are starting freshly with makeup are usually adviced to use this.
7. Spray Foundation; These are fairly new in the market and comes in a can spray bottle. You can spray on a foam applicator and apply to face or just apply directly.
I have seen several types of application and sometimes one is dismayed at how the full look comes out...Im not going to put up pictures so that i do not offend any body.Below Im going to take you through how to apply foundation properly....
HOW TO APPLY FOUNDATION..
1.Choose well- The first and most important thing is to make sure you have the right colour for your skin.Quite a lot of times you are told to use 2 or 3 foundation colours based on the amount of skin tones you have but the best thing will be to get a concealer that is 1 or 2 colours lighter than your main skin colour and use that to hide your imperfections. You can now go ahead and apply your foundation. The best way to find the right foundation for your skin is to go bared faced to the departmental store that specialize in these products and have a makeup artist help you pick out a right colour by trying it on your skin to get a near perfect match.
2.Have the right tools-Foundation can be applied with sponge applicators, foundation brush etc depending on the type of foundation you are using from the above list.
3.Using your sponge applicator(damp); Dot little bits of foundation on forehead, nose, chin and work your way outwards towards your hair line. Make sure to blend properly into hair so that it dissapears and does not leave visible application lines.
4.View your application in natural light to see if you have missed any areas or need proper blending. Blend into your chin properly towards neck so foundation dissappears into neck area.
5.If you have excess foundation on, Please use my special SAM FINE trick. Get tissue paper and split into 2(most tissues come in 2ply hence the splitting). Use just the single sheet to GENTLY DAB at the foundation thereby taking out the excess.
6. Finally apply a little bit of powder to complete your look.
I always encourage you to leave a comment..... Remain Beautiful x
Subscribe to:
Posts (Atom)